PURPOSE:
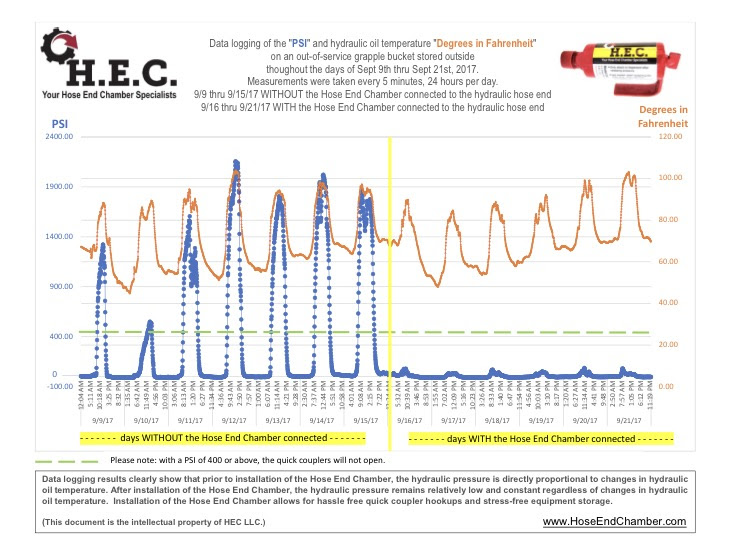
The purpose of the Hose End Chamber is the prevention of pressure building up due to thermal expansion.
PROCEDURE STEPS:
Perform the following to INSTALL the Hose End Chamber:
CAUTION· Always use caution around equipment and hydraulics. High pressure oil can injure or kill. Equipment can move, settle, or cause serious injury.· For large folding wings on equipment (like field diggers) make sure it is secured against mechanical stops. Use two large Hose End Chambers in each line to prevent unwanted movement of wings.· DO NOT tow or haul implements with the Hose End Chamber attached. |
NOTEOnly one Hose End Chamber is required per circuit on smaller implements. Large circuits may benefit from two or a larger sized Hose End Chamber to prevent movement of implement due to thermal expansion. |
1. Ensure you have purchased the correct hydraulic tip to mate to the hydraulic tip style you currently have on your attachment or implement.
2. Perform the following to unhook your attachment or implement:
a. Release any pressure in the system back through the carrier (i.e, tractor, skid loader, truck, or excavator).
b. If implement is raised, then lower to the ground or engage the transport lock.
NOTEDO NOT park or store the attachment or implement cylinder fully extended or retracted. To prevent thermal expansion in both hoses for the Hose End Chamber, the cylinder may need to move every so lightly. If your cylinder can only be parked fully extended or fully retracted, then you will need a Hose End Chamber on both hoses. |
3. Identify the non-load bearing side of the circuit (this is usually the rod end of a hydraulic system). This is especially important on self-supporting quick tach tractor loaders.
NOTEThe Hose End Chamber should NOT be inserted into a pressurized circuit. Release any pressure in the system before attaching the Hose End Chamber. |
4. When all hoses have been unattached from the main power source, then plug the Hose End Chamber into this side of the system.
NOTENormal temperature and pressure changes can occur continuously day or night and through season changes. |
5. To prevent pressure increases, the Hose End Chamber should remain attached until the next use.
6. Hang the Hose End Chamber in a vertical position with the drain plug up. This will allow expansion and contraction in and out of the Hose End Chamber without draining oil from the lines into the Hose End Chamber.
Perform the following to REMOVE the Hose End Chamber:
1. Unhook the Hose End Chamber before re-attaching any of the hoses of your implement power source.
CAUTIONHose End Chamber may have some residual pressure. |
NOTE· Under normal use, you should only need to drain residual oil out of the Hose End Chamber through the drain plug periodically depending on usage. · The drain plug is only for draining residual oil in the Hose End Chamber. It is not necessary to drain pressure out of the Hose End Chamber prior to unhooking the implement. Used correctly, there will be very little pressure in the Hose End Chamber which should not interfere with the normal operation of hydraulic quick coupler. |
2. Verify no residual hydraulic fluid remains in the Hose End Chamber prior to re-use:
a. Position the Hose End Chamber with drain plug up.
b. Slowly open drain plug.
c. Bleed off any air/pressure with drain plug up.
d. Rotate Hose End Chamber with drain plug down to drain any hydraulic fluid.
3. Reinstall the drain plug with “O” ring and gently snug for a leak proof seal.
Contact Us!
Hose End Chamber
N7224 Lap Rd, Mt Calvary, Wi 53057
(920)-948-1798
dmaneyhec@gmail.com
Find us on Facebook here!